
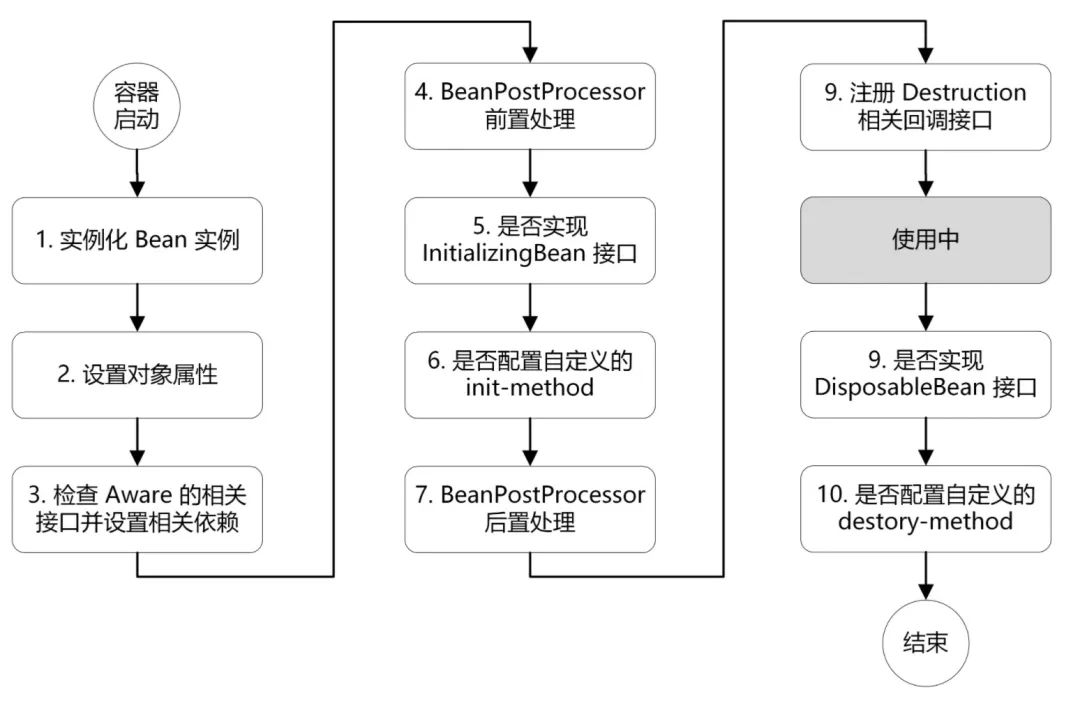
Bean 生命周期
Bean 生命周期
接口
BeanFactoryPostProcessor 接口
通过 BeanFactoryPostProcessor 提供的 beanFactory 进行 Bean 的注册,常规的自定义 Bean 可以完全由此加载
@Configuration
public class SelfBeanFactoryLoader implements BeanFactoryPostProcessor {

  @Override
  public void postProcessBeanFactory(
    ConfigurableListableBeanFactory beanFactory
  )
    throws BeansException {
    beanFactory.registerSingleton("windowQpsControl", new WindowQpsControl());
  }
}
BeanDefinitionRegistryPostProcessor 接口
这个接口是继承自 BeanFactoryPostProcessor Bean 注册相关的可以参考上文:
@Configuration
public class SelfBeanLoader implements BeanDefinitionRegistryPostProcessor {

  @Override
  public void postProcessBeanFactory(
    ConfigurableListableBeanFactory beanFactory
  )
    throws BeansException {}

  @Override
  public void postProcessBeanDefinitionRegistry(
    BeanDefinitionRegistry registry
  )
    throws BeansException {
    AnnotatedGenericBeanDefinition cacheHelper = new AnnotatedGenericBeanDefinition(
      CacheHelper.class
    );
    registry.registerBeanDefinition("cacheHelper", cacheHelper);
  }
}
ApplicationContextAware
这个接口比较靠后也是大家使用比较多的,在前两者 Bean 的基础上,增加 xml 注入,而且这里给出了另外一个参数 environment,便于用户在此注入特殊的 profile。
@Configuration
public class SelfContextLoader implements ApplicationContextAware {
  private ApplicationContext context;

  @Override
  public void setApplicationContext(ApplicationContext applicationContext)
    throws BeansException {
    this.context = applicationContext;
    addBeans();
  }

  private void addBeans() {
    if (this.context instanceof ConfigurableApplicationContext) {
      ConfigurableListableBeanFactory factory =
        ((ConfigurableApplicationContext) this.context).getBeanFactory();
      Environment environment = context.getEnvironment();
      System.out.println("......environment :" + environment);
      factory.registerSingleton("client", new Client());
      try {
        if (factory instanceof BeanDefinitionRegistry) {
          // 加载XML
          ResourcePatternResolver rp = new PathMatchingResourcePatternResolver();

          Resource[] resources = rp.getResources("classpath*:inner.xml"); // 加载A
          new XmlBeanDefinitionReader((DefaultListableBeanFactory) factory)
          .loadBeanDefinitions(resources);
        }
      } catch (Exception e) {
        e.printStackTrace();
      }
    } else {
      throw new RuntimeException(" the environment is wrong !!!");
    }
  }
}
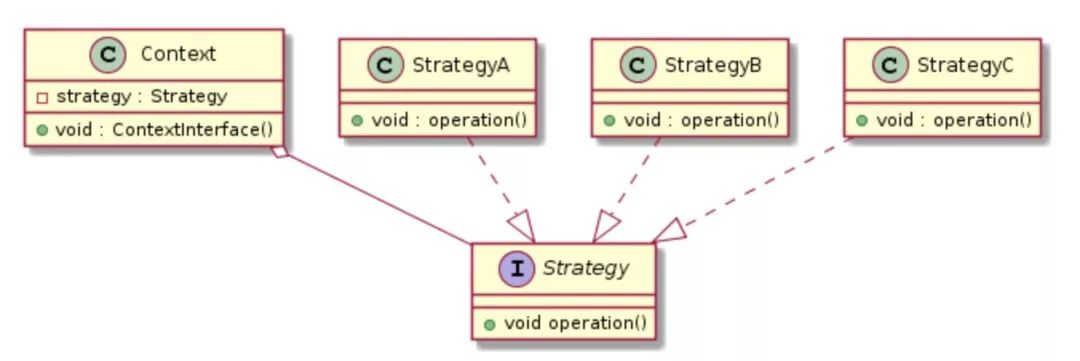
案例:结合策略模式
策略模式相信大家都应该比较熟悉,它定义了一系列的算法,并将每一个算法封装起来,使每个算法可以相互替代,使算法本身和使用算法的客户端分割开来,相互独立。其适用的场景是这样的:一个大功能,它有许多不同类型的实现(策略类),具体根据客户端来决定采用哪一个策略类。比如下单优惠策略、物流对接策略等,应用场景还是非常多的。
举一个简单的例子,业务背景是这样的:平台需要根据不同的业务进行鉴权,每个业务的鉴权逻辑不一样,都有自己的一套独立的判断逻辑,因此需要根据传入的 bizType 进行鉴权操作,首先我们定义一个权限校验处理器接口如下。
/**
 * 业务权限校验处理器
 */
publicinterface PermissionCheckHandler {
    /**
     * 判断是否是自己能够处理的权限校验类型
     */
    boolean isMatched(BizType bizType);
    /**
     * 权限校验逻辑
     */
    PermissionCheckResultDTO permissionCheck(Long userId, String bizCode);
}

// 业务1的鉴权逻辑我们假设是这样的:

/**
 * 冷启动权限校验处理器
 */
@Component
publicclass ColdStartPermissionCheckHandlerImpl implements PermissionCheckHandler {
    @Override
    public boolean isMatched(BizType bizType) {
        return BizType.COLD_START.equals(bizType);
    }
    @Override
    public PermissionCheckResultDTO permissionCheck(Long userId, String bizCode) {
        //业务特有鉴权逻辑
    }
}

// 业务2的鉴权逻辑我们假设是这样的:

/**
 * 趋势业务权限校验处理器
 */
@Component
publicclass TrendPermissionCheckHandlerImpl implements PermissionCheckHandler {
    @Override
    public boolean isMatched(BizType bizType) {
        return BizType.TREND.equals(bizType);
    }
    @Override
    public PermissionCheckResultDTO permissionCheck(Long userId, String bizCode){
        //业务特有鉴权逻辑
    }
}
Spring 主要为我们提供了三类扩展点,分别对应不同 Bean 生命周期阶段:
- Aware 接口
- BeanPostProcessor
- InitializingBean 和 init-method
我们这里用到的主要是 Aware 接口和 InitializingBean 两个扩展点,其主要用法如下代码所示,关键点就在于实现 ApplicationContextAware 接口的 setApplicationContext 方法和 InitializingBean 接口的 afterPropertiesSet 方法。实现 ApplicationContextAware 接口的目的就是要拿到 Spring 容器的资源,从而方便的使用它提供的 getBeansOfType 方法(该方法返回的是 map 类型,key 对应 beanName, value 对应 bean);而实现 InitializingBean 接口的目的则是方便为 Service 类的 handlers 属性执行定制初始化逻辑。
可以很明显的看出,如果以后还有一些其他的业务需要制定相应的鉴权逻辑,我们只需要编写对应的策略类就好了,无需再破坏当前 Service 类的逻辑,很好的保证了开闭原则。
/**
 * 权限校验服务类
 */
@Slf4j
@Service
publicclass PermissionServiceImpl
    implements PermissionService, ApplicationContextAware, InitializingBean {
    private ApplicationContext applicationContext;
    //注:这里可以使用Map,偷个懒
    private List<PermissionCheckHandler> handlers = new ArrayList<>();

    @Override
    public PermissionCheckResultDTO permissionCheck(ArtemisSellerBizType artemisSellerBizType, Long userId,
                                                    String bizCode) {
        //省略一些前置逻辑
        PermissionCheckHandler handler = getHandler(artemisSellerBizType);
        return handler.permissionCheck(userId, bizCode);
    }

    private PermissionCheckHandler getHandler(ArtemisSellerBizType artemisSellerBizType) {
        for (PermissionCheckHandler handler : handlers) {
            if (handler.isMatched(artemisSellerBizType)) {
                return handler;
            }
        }
        return null;
    }

    @Override
    public void afterPropertiesSet() throws Exception {
        for (PermissionCheckHandler handler : applicationContext.getBeansOfType(PermissionCheckHandler.class)
            .values()) {
            handlers.add(handler);
            log.warn("load permission check handler [{}]", handler.getClass().getName());
        }
    }

    @Override
    public void setApplicationContext(ApplicationContext applicationContext) throws BeansException {
        this.applicationContext = applicationContext;
    }
}