
文件上传
文件上传
文件上传在 Web 开发中应用很广泛,我们经常发微博、发微信朋友圈都用到了图片上传功能。文件上传是指将本地图片、视频、音频等文件上传到服务器上,可以供其他用户浏览或下载的过程。上传文件时必须做好文件的安全性,除了前端必要的验证,如文件类型、后缀、大小等验证,重要的还是要在后台做安全策略。
这里我列举几个注意点:
- 后台需要进行文件类型、大小、来源等验证
- 定义一个.htaccess 文件,只允许访问指定扩展名的文件。
- 将上传后的文件生成一个随机的文件名,并且加上此前生成的文件扩展名。
- 设置上传目录执行权限,避免不怀好意的人绕过如图片扩展名进行恶意攻击,拒绝脚本执行的可能性。
const input = document.querySelector('input[type="file"]');

const data = new FormData();
data.append("file", input.files[0]);
data.append("user", "hubot");

fetch("/avatars", {
  method: "post",
  body: data,
});
请求端
浏览器端
对于浏览器端的文件上传,可以归结出一个套路,所有东西核心思路就是构造出 File 对象。然后观察请求 Content-Type,再看请求体是否有信息缺失。而以上这些二进制数据类型的转化可以看以下表。
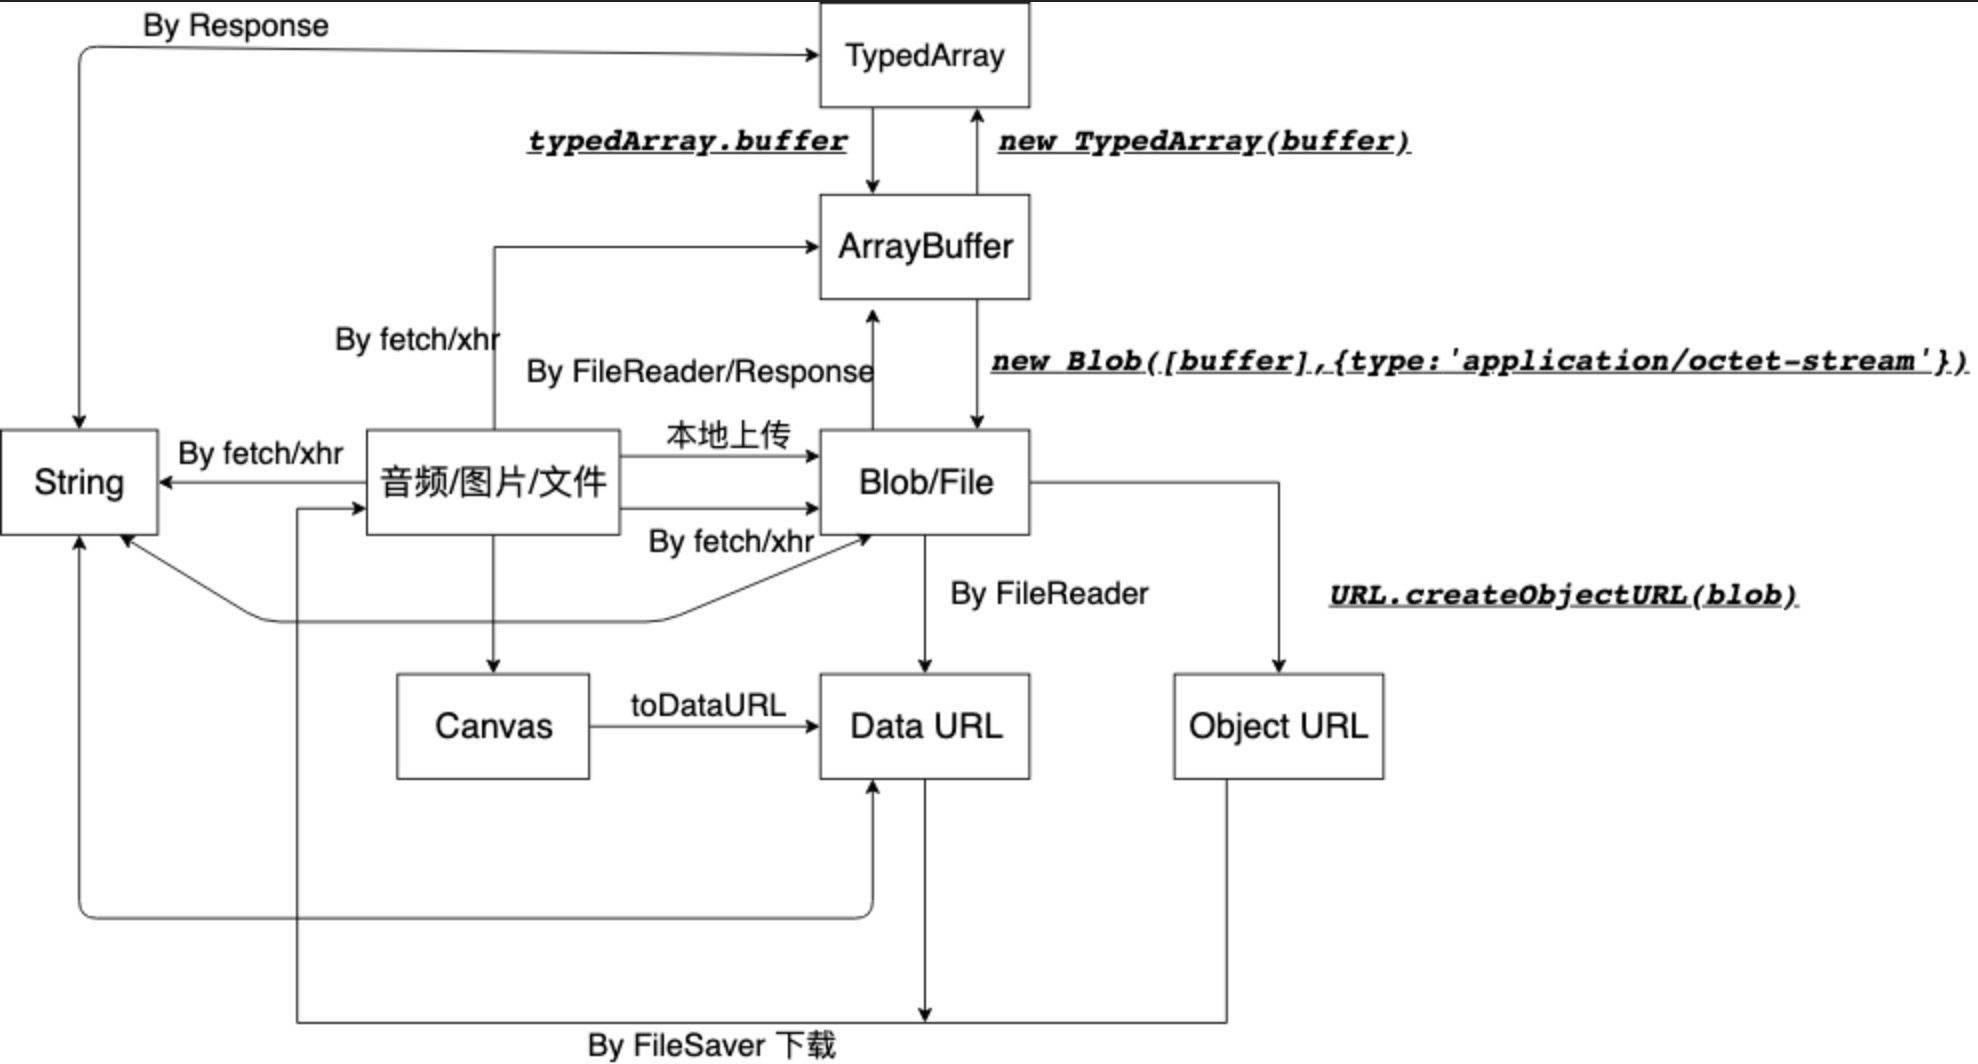
File
首先我们先写下最简单的一个表单提交方式。
<form action="http://localhost:7787/files" method="POST">
  <input name="file" type="file" id="file" />
  <input type="submit" value="提交" />
</form>
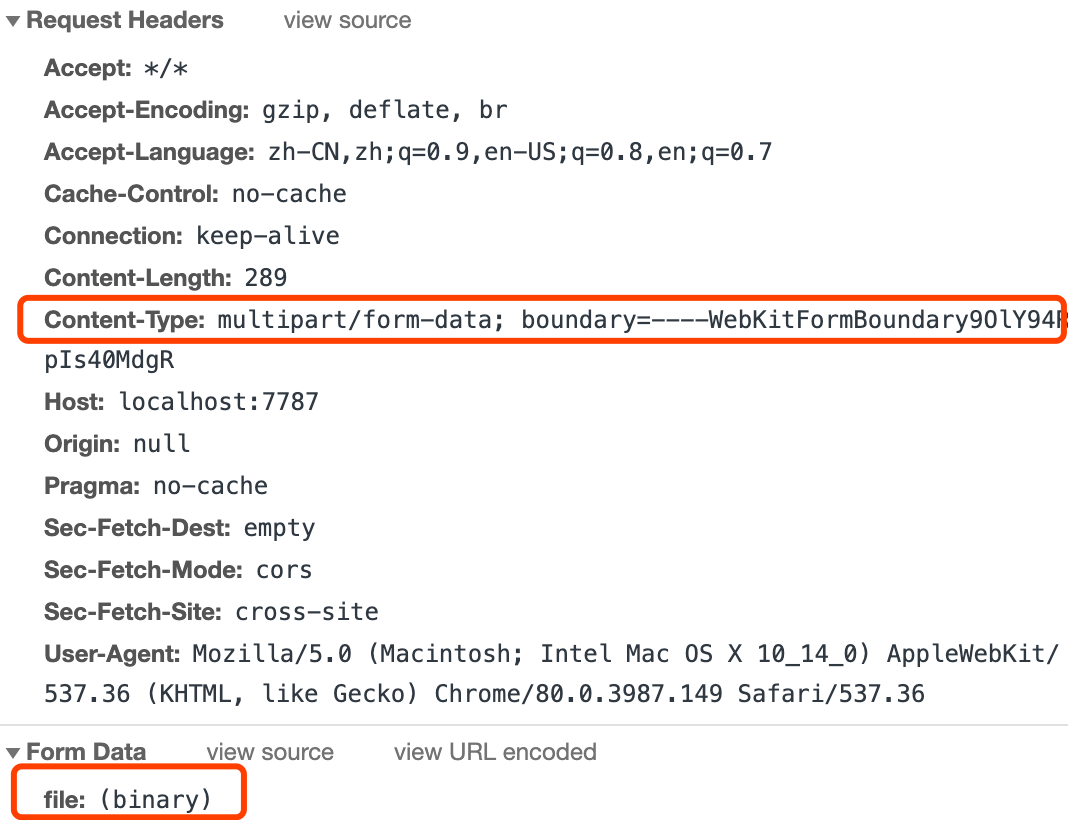
这个表单是无法实际进行传输的,其实 FormData 中 file 字段显示的是文件名,并没有将真正的内容进行传输。再看请求头:
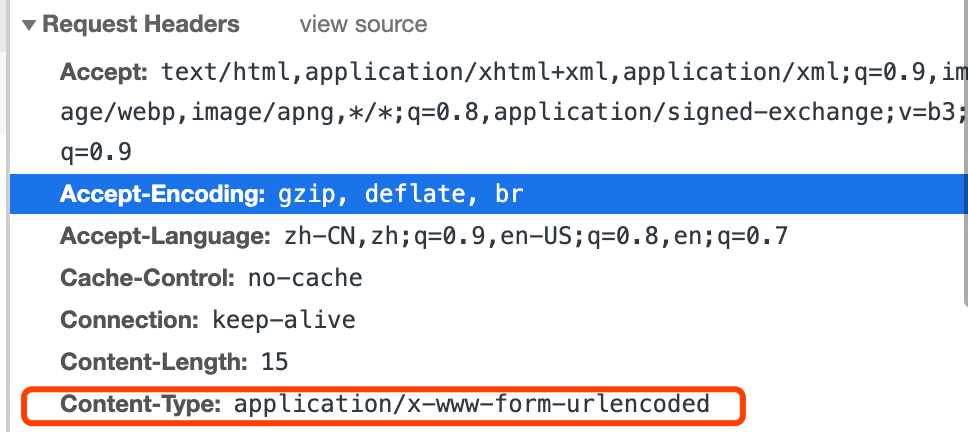
发现是请求头和预期不符,也印证了 application/x-www-form-urlencoded 无法进行文件上传。我们加上请求头,再次请求。
<form
  action="http://localhost:7787/files"
  enctype="multipart/form-data"
  method="POST"
>
  <input name="file" type="file" id="file" />
  <input type="submit" value="提交" />
</form>
FormData
<input type="file" id="file" />
<button id="submit">上传</button>
<script src="https://cdn.bootcss.com/axios/0.19.2/axios.min.js"></script>
<script>
  submit.onclick = () => {
    const file = document.getElementById("file").files[0];
    var form = new FormData();
    form.append("file", file);

    // type 1
    axios.post("http://localhost:7787/files", form).then((res) => {
      console.log(res.data);
    });
    // type 2
    fetch("http://localhost:7787/files", {
      method: "POST",
      body: form,
    })
      .then((res) => res.json())
      .tehn((res) => {
        console.log(res);
      });
    // type3
    var xhr = new XMLHttpRequest();
    xhr.open("POST", "http://localhost:7787/files", true);
    xhr.onload = function() {
      console.log(xhr.responseText);
    };
    xhr.send(form);
  };
</script>
Blob
Blob 对象表示一个不可变、原始数据的类文件对象。Blob 表示的不一定是 JavaScript 原生格式的数据。File (opens new window)接口基于 Blob,继承了 blob 的功能并将其扩展使其支持用户系统上的文件。因此如果我们遇到 Blob 方式的文件上方式不用害怕,可以用以下两种方式:
- 直接使用 blob 上传
const json = { hello: "world" };
const blob = new Blob([JSON.stringify(json, null, 2)], {
  type: "application/json",
});

const form = new FormData();
form.append("file", blob, "1.json");
axios.post("http://localhost:7787/files", form);
- 使用 File 对象,再进行一次包装
const json = { hello: "world" };
const blob = new Blob([JSON.stringify(json, null, 2)], {
  type: "application/json",
});

const file = new File([blob], "1.json");
form.append("file", file);
axios.post("http://localhost:7787/files", form);
ArrayBuffer
ArrayBuffer 对象用来表示通用的、固定长度的原始二进制数据缓冲区。虽然它用的比较少,但是他是最贴近文件流的方式了。在浏览器中,他每个字节以十进制的方式存在。我提前准备了一张图片。
const bufferArrary = [
  137, 80, 78, 71, 13, 10, 26, 10, 0, 0, 0, 13, 73, 72, 68, 82, 0, 0, 0, 1, 0,
  0, 0, 1, 1, 3, 0, 0, 0, 37, 219, 86, 202, 0, 0, 0, 6, 80, 76, 84, 69, 0, 0,
  255, 128, 128, 128, 76, 108, 191, 213, 0, 0, 0, 9, 112, 72, 89, 115, 0, 0, 14,
  196, 0, 0, 14, 196, 1, 149, 43, 14, 27, 0, 0, 0, 10, 73, 68, 65, 84, 8, 153,
  99, 96, 0, 0, 0, 2, 0, 1, 244, 113, 100, 166, 0, 0, 0, 0, 73, 69, 78, 68, 174,
  66, 96, 130,
];
const array = Uint8Array.from(bufferArrary);
const blob = new Blob([array], { type: "image/png" });
const form = new FormData();
form.append("file", blob, "1.png");
axios.post("http://localhost:7787/files", form);
这里需要注意的是 new Blob([typedArray.buffer], {type: ‘xxx’}),第一个参数是由一个数组包裹。里面是 typedArray 类型的 buffer。
Base64
const base64 =
  "iVBORw0KGgoAAAANSUhEUgAAAAEAAAABAQMAAAAl21bKAAAABlBMVEUAAP+AgIBMbL/VAAAACXBIWXMAAA7EAAAOxAGVKw4bAAAACklEQVQImWNgAAAAAgAB9HFkpgAAAABJRU5ErkJggg==";
const byteCharacters = atob(base64);
const byteNumbers = new Array(byteCharacters.length);
for (let i = 0; i < byteCharacters.length; i++) {
  byteNumbers[i] = byteCharacters.charCodeAt(i);
}
const array = Uint8Array.from(byteNumbers);
const blob = new Blob([array], { type: "image/png" });
const form = new FormData();
form.append("file", blob, "1.png");
axios.post("http://localhost:7787/files", form);
Node 端上传
const path = require("path");
const fs = require("fs");
const http = require("http");

// 定义一个分隔符,要确保唯一性
const boundaryKey = "-------------------------461591080941622511336662";
const request = http.request({
  method: "post",
  host: "localhost",
  port: "7787",
  path: "/files",
  headers: {
    "Content-Type": "multipart/form-data; boundary=" + boundaryKey, // 在请求头上加上分隔符
    Connection: "keep-alive",
  },
});

// 写入内容头部
request.write(
  `--${boundaryKey}\r\nContent-Disposition: form-data; name="file"; filename="1.png"\r\nContent-Type: image/jpeg\r\n\r\n`
);
// 写入内容
const fileStream = fs.createReadStream(path.join(__dirname, "../1.png"));
fileStream.pipe(request, { end: false });
fileStream.on("end", function () {
  // 写入尾部
  request.end("\r\n--" + boundaryKey + "--" + "\r\n");
});
request.on("response", function (res) {
  console.log(res.statusCode);
});
我们也可以直接使用 form-data 库:
const path = require("path");
const FormData = require("form-data");
const fs = require("fs");
const http = require("http");

const form = new FormData();
form.append("file", fs.readFileSync(path.join(__dirname, "../1.png")), {
  filename: "1.png",
  contentType: "image/jpeg",
});
const request = http.request({
  method: "post",
  host: "localhost",
  port: "7787",
  path: "/files",
  headers: form.getHeaders(),
});
form.pipe(request);
request.on("response", function (res) {
  console.log(res.statusCode);
});
Node 端接收
const koaBody = require("koa-body");

app.use(koaBody({ multipart: true }));
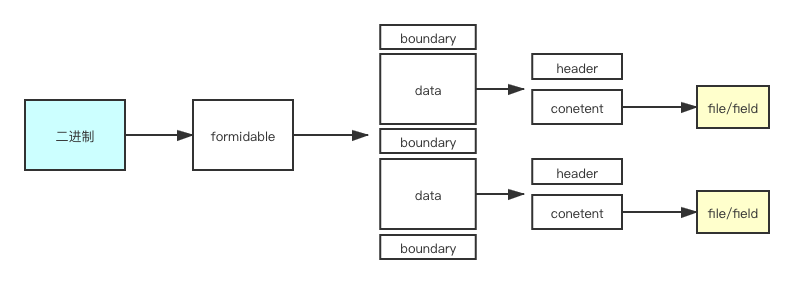
我们来看看最常用的 koa-body,它的使用方式非常简单,短短几行,就能让我们享受到文件上传的简单与快乐(其他源码库一样的思路去寻找问题的本源) 可以带着一个问题去阅读,为什么用了它就能解析出文件?看完 koa-body 我们得出的结论是,koa-body 的核心方法是 formidable,那么让我们继续深入。
const fs = require("fs");
const http = require("http");
const querystring = require("querystring");
const server = http.createServer((req, res) => {
  if (req.url === "/files" && req.method.toLowerCase() === "post") {
    parseFile(req, res);
  }
});
function parseFile(req, res) {
  req.setEncoding("binary");
  let body = "";
  let fileName = "";
  // 边界字符
  let boundary = req.headers["content-type"]
    .split("; ")[1]
    .replace("boundary=", "");

  req.on("data", function (chunk) {
    body += chunk;
  });
  req.on("end", function () {
    // 按照分解符切分
    const list = body.split(boundary);
    let contentType = "";
    let fileName = "";
    for (let i = 0; i < list.length; i++) {
      if (list[i].includes("Content-Disposition")) {
        const data = list[i].split("\r\n");
        for (let j = 0; j < data.length; j++) {
          // 从头部拆分出名字和类型
          if (data[j].includes("Content-Disposition")) {
            const info = data[j].split(":")[1].split(";");
            fileName = info[info.length - 1].split("=")[1].replace(/"/g, "");
            console.log(fileName);
          }
          if (data[j].includes("Content-Type")) {
            contentType = data[j];
            console.log(data[j].split(":")[1]);
          }
        }
      }
    }
    // 去除前面的请求头
    const start = body.toString().indexOf(contentType) + contentType.length + 4; // 有多\r\n\r\n
    const startBinary = body.toString().substring(start);
    const end = startBinary.indexOf("--" + boundary + "--") - 2; // 前面有多\r\n
    // 去除后面的分隔符
    const binary = startBinary.substring(0, end);
    const bufferData = Buffer.from(binary, "binary");
    fs.writeFile(fileName, bufferData, function (err) {
      res.end("sucess");
    });
  });
}

server.listen(7787);